|
|
In last month's column, we talked about the ingredients necessary to create a fine, compact lighting kit. Now, let's discuss the best ways to put this stuff to use. We'll start with the Basic Three-Light Interview Setup: key, fill, back/background. It's usual to position the key light first. The preferred instrument is a focusable source (Lowel Pro-Light, Arri fresnel), or, if you're going for a more diffuse look, a soft lightbox like the Chimera. Many DP's put their key on the same side as the camera. I prefer to set my key on the opposite side (see sketch), about 45 degrees off axis from the subject's face. This puts the camera-side of the face in part-shadow, which, to my eye, adds depth to the scene. The key is usually a "punchy" light, so focus the beam down toward spot. And use the barndoors to control any beam spill on the background.
How are you going to adjust the brightness of the fill light? There are several ways: Focus the light down to flood. This is the quickest way to reduce the output. Move the fixture farther from the subject (not always practical). Use metal scrims to cut the light. A double scrim is equivalent to one f-stop, a single scrim to half-a-stop. Put diffusion gel in front of the light. This has the advantage of softening the light while at the same time, cutting the intensity. Bounce the fill into a white card or umbrella. When shooting video it is almost imperative to use a fill. A widely-used technique among still photographers and cinematographers is to key from 90 degrees and use no fill. This gives a very dramatic effect. And it works, because film has such a wide contrast ratio. But our little video cameras have narrow ratios, and the no-fill setup will look awful because it will be too stark. I often use a very weak fill (say, 10% of the key) to achieve a similar look. You can warm up your subjects by telling them jokes, or put some warming gels on the key and/or fill. A 1/4 or 1*2 CTO usually does the trick. Just be sure to white balance without the color gels in place. Now for the third light. Note that I called it a back/background fixture. You can use it for either purpose. In the backlight mode, it's best to set the light behind and above the subject's head/shoulders. Finding a way to do this without a light boom is always a challenge, and hence, part of the fun of lighting for video. This is why I suggested clamps and pigeons for your grip kit. For the best results, line the beam on a direct axis between the light, the subject and the camera. This ensures even lighting across the shoulders, which is really what a backlight is for. All you're trying to do is create a bit of separation between the subject and the background (especially if the BG is dark and the subject is wearing a dark color). Try to keep light off the top of the subject's head (using the barndoors to trim the beam). An otherwise beautifully-lit shot can be ruined by a glowing mane or shiny pate. The other use for this fixture is to illuminate the background. Set the light on either side of the camera so that it has an unobstructed throw to the wall. Using the barndoors, you can create a narrow "slash" effect, or you can cut the light toward the top or the bottom of the frame. Generally, try to keep the background 50 to 60% of the subject brightness. With your BG light you are striving to add definition to the background, without overpowering the foreground. To add more interest, you might put a color gel in front of the BG light. I prefer warming or cooling colors-the "cine" blues or CTO series, usually in strengths up to 1*2. Some producers love more saturated color, which requires "theatrical" gels. A sheet of a good red, a green and a blue should be sufficient for your kit. If you want to have both a backlight and a background light, you're probably going to have to add a fourth instrument to your kit. Another alternative would be to use a "practical" fixture (like a table lamp or wall sconce), but take care, because their color temperature is usually much warmer than your lights, and will screw up your color balance. When doing any kind of lighting, bear in mind that "shadows are our friends." Too much light has no character. Too little light looks, well, blah. The right balance of foreground and background, and light and dark, can add depth and richness to any scene. Here are some practical tips when lighting for an interview: Spend a few minutes at the location looking at all the different setup possibilities. Look for one which has both depth and an interesting background. Take care not to overload the circuit. Spread your load to at least two separate circuits, even if you're using low wattage lamps. If the room in which you are shooting has a lot of windows with daylight streaming in, you have but two choices: gel your lights with full blue to match the color temp (and lose 2/3 of a stop), or block the offensive light by closing curtains or hanging battens. If you use a practical in the scene, control the intensity with a dimmer (buy a 600w slide or knob-type, available at any hardware store). Stay away from walls! Unless it is physically impossible, try sitting your subject at least four feet from the wall, farther if it's a white wall. Don't stick gaffer's tape on somebody's wall. It's going to pull off the paint or paper, and they're going to get a bit hot under the collar. Next time we'll look at lighting general spaces, and I'll give you some ideas on how to add interest to a scene using materials at hand (like a newspaper and a pair of scissors). Steve Smith
|
|||||
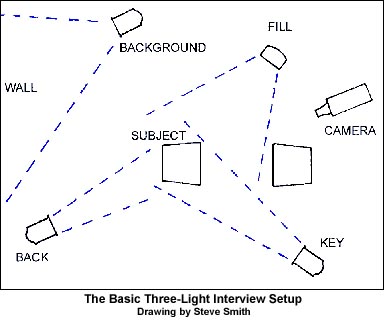 The
fill can go anywhere on the side opposite the key (see sketch).
I usually set it about 60 degrees off axis. Typically, the beam
from the fill light is half (or less) of the key. You don't need
a light meter to measure the difference, as long as you have a color
monitor to check the scene as you go. With someone sitting in for
the subject, just make the ratio between the key and the fill the
one which most pleases your eye (or, in many cases, your producer's
eye).
The
fill can go anywhere on the side opposite the key (see sketch).
I usually set it about 60 degrees off axis. Typically, the beam
from the fill light is half (or less) of the key. You don't need
a light meter to measure the difference, as long as you have a color
monitor to check the scene as you go. With someone sitting in for
the subject, just make the ratio between the key and the fill the
one which most pleases your eye (or, in many cases, your producer's
eye).