 |
The Versatile Panasonic SDX900 Camcorder
January 2004
|
 |
|
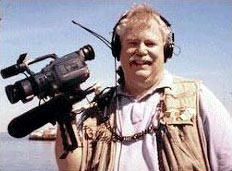
At long last! I've been promising this review for months, and finally got my hands on a Panasonic SDX900 DVCPro camcorder. And it's a honey.
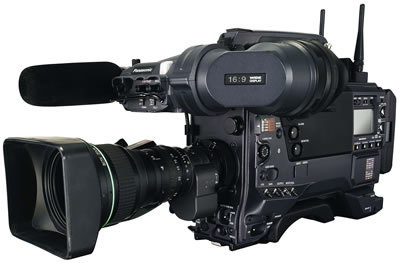
The SDX is a in a class of cameras I call "big cameras" - like all the serious TV guys lug around on their shoulders. It records Panasonic's DVCPro version of the DV format. But it does so at two different rates - 25mps and 50mps. The former is standard 4:1:1 DVCPro, but in the latter mode, the tape moves at twice the speed and the recording is a full 4:2:2 digital signal, on par with Sony's top-of-the-line Digital Betacam. Like many cameras today, the SDX lets you set the frame to either standard 4:3 or wide-screen 16:9. It's true 16:9, employing three 520k wide-screen 2/3" CCD's.
And - this is the coolest part - the SDX900 lets you select four different frame modes - standard 60i (60 fields per second, interlace), 30p (30 frames per second, progressive scan), or 24p/24pa (24 frames per second, progressive scan, to achieve a "film-look").
Let's take a closer look at this ground-breaking camera.
The SDX900 body looks like any other big camera: large adjustable viewfinder, B4 lens mount, main controls on the left side, tape loading on the right, connectors on the back - a form-factor essentially unchanged since Sony introduced its BVW-200 nearly twenty years ago. The SDX weighs-in at just under fifteen pounds, with lens and battery.
The operator's side of the camera is where all the action is. Grouped near the front end are the usual controls, like on-off, video gain, white balance, front-mike audio gain, audio monitor level, and shutter buttons. There is also a handy MODE CHECK selector, that lets you see four pages of the camera's settings in the viewfinder, a handy feature for a complex menu-driven beast like this. There is a trio of USER buttons, that permit a quick switch between different camera settings.
Toward the rear of the left side are all the audio and time code controls. The large LCD display panel shows items like tape remaining, battery level, audio levels, time code and various warnings (servo, slack, RF). A pair of recessed pots lets you set your audio levels. Below the display is a switch panel for setting up time code and audio monitoring.
The front of the SDX has a bunch more buttons, including the auto white and black balance switch, the shutter switch, the dual filter wheels (one for color, the other for neutral density), the VTR start/stop, and the all important MENU on/off and MENU JOG controls. It is through those that you will access the camera's myriad settings. There's also an XLR connector for the front microphone, a mini-jack headset output and the viewfinder connector.
The right side of the camera is pretty barren. There are time code in/out, genlock and monitor out connectors (BNC's) and the cassette door.
At the back is another bank of connectors for audio-in (XLR3), audio-out (XLR5), 12v DC input (XLR4), 12v DC output (Hirose), video out (BNC) and remote control. A pair of slide switches let you set the audio inputs - line, mic and phantom mic (48v). The SDX900 comes standard with an integral Anton/Bauer battery mount.
On top you'll find the GPS connector, a hatch for a built-in radio mic, front and rear tally lights, VCR controls, and the viewfinder mount.
There are two viewfinders available from Panasonic. The standard one is 4:3 only. If you plan on buying an SDX900 I highly recommend you order the AJ-VF20WP. It's image is bigger, brighter, sharper and switchable between 4:3 and 16:9. The finders have additional controls for such things as zebra, tally, peaking, brightness and contrast.
Loading the camcorder is pretty straight forward - just open the tape door, drop in the cassette, close the door. A word about tape. Use only tapes designed for DVCPro, and bear in mind that if you shoot in the higher-quality 50mps mode, actual record time will be half that printed on the cassette (i.e., a P66MP tape will record for 33 minutes). It will not accept miniDV tapes.
So, now you're ready to shoot.
Well, not quite. You'll need some time to set the SDX up for your shooting situation. A good bit of time, actually.
Here's where the MENU and MENU JOG controls come into play. Hold the MENU button down for three seconds and you'll see a list of items pop-up in the viewfinder: System Setting, Paint, VF, Operation, File, Maintenance, VTR and User Menu Select. Turning the MENU JOG knob lets you select one of these options. Push the JOG button in and the selected item reveals a second level of menus. For example, the System Setting item brings up Record Signal, Camera Mode, V Res, Rec Mode, Set Up 50, Set Up 25, PB Mode, Rec Tally. Clicking Camera Mode puts you into yet another menu, this one for selecting whether you want to shoot in 60i, 30p, 24p or 24pa (a = advanced, more later). Make your selection and jog down to Rec Mode, where you can choose between 4:3 and 16:9, 25mps or 50mps.
A word about the 24p film-look: the quality of the image is very like that of 16mm film, but without the scratches and hairs in the gate (you can add those in post production, if you like).
If you want to diddle with the SDX's color controls, go to the Paint menu and begin selecting from twelve different items, including skin tone detail, knee, gamma and flare. With all these controls at your fingertip, this is where the Panasonic shines brightest. But be very careful in the Paint mode. If you don't know what you're doing you can throw the whole camera out of whack (fortunately, there is a menu reset function to return the SDX to its factory presets). Painting is best left to more experienced operators (or engineers) and is best done with a studio-grade monitor and a waveform/vectorscope. Paint is where all the action is regarding setting the camera to replicate certain "looks." I've even heard of folks who try to match the SDX to specific Kodak or Fuji film stocks.
Once you've decided on a look, you can store all the information in one of four User Scene Files, or on a standard SD Memory Card. The SD card is cool, because users can then swap looks back and forth, via e-mail text attachments, if you want. We currently have a memory card with eight different scene files created by a Philadelphia cinematographer. One of them is called "Amelie," after the French movie. Why? Well, if you saw "Amelie" you'll recall that many shots are tinged with greens and yellows. And that's what this one scene file gives you. Frankly, I thought it looked a bit garish, much more so than the movie. But that just illustrates the possibilities inherent in setting up the SDX.
Just how extensive are the menus in this Panasonic? The operation manual has twenty-four pages devoted to menu descriptions. It can be a bit overwhelming. And that can be a problem when you need to make a quick change to the camera's setup. I think the best strategy for using the SDX900 is to have a couple of really basic user settings loaded in the camera, say, one in 60i for ENG-style work, another in 24p for film-look documentary work. These you can access in seconds. Then, if you need something fancier, store special settings in the Scene File memory or on an SD card. That should cover most of the bases.
A curious menu item is Battery/Tape. Panasonic wants you to select the type of battery you're going to use so that the SDX900 can optimize itself. Three and a half pages of the operation manual are devoted to the battery menu.
The 900 has two adjustable "zebra" patterns for exposure determination. Both are settable (in a menu, of course) to either 70% (good for faces) and 109% (for highlights). Normal practice is to set one of each, so you'll have an exposure range. But some people find two zebra patterns distracting and confusing. You can turn off either, if you like. If you use just one, I would pick the 109%. Why? I knew a fellow once who shot an hour documentary with a camera set to 100% zebra. But he thought it was 70% zebra, and he ended up over-exposing virtually every frame, because when you over-expose video, especially digital video, the image breaks up and is irrecoverable.
Not content with having a single image area for reading the white balance, the SDX offers you a choice of three: 25%, 50% and 90%. I'd probably pick the middle one, just for good measure.
The Digital Super Gain is interesting. You can go up to +68dB with DSG, and the image can be relatively noise-free. The 900 does this by varying the frame rate. So, at the high setting the camera is running at six frames per second. Obviously, any moving object in the frame will be speeded up by a factor of four. DGS is best used in low-light situations where there is little or no movement. The mode's use is limited, but might save your tush some dark day.
It's not unusual for "little cameras" to have a "digital zoom" feature. But the SDX is unique among big cameras to offer DZ. There are some digital artifacts when you use this mode, but again, like the Digital Super Gain, digital zoom can be a lifesaver when you need just a little bit more reach. You can set it to be on all the time, or only when you focus (as a focusing aide).
There are some options for the SDX900 that are worth noting. At Videosmith we installed the YA902G SDI output board. One disadvantage of the camera as it is currently offered is that there is no Firewire (IEEE1394) capability. So SDI (Serial Digital Interface) is the best way to get high-quality images out of the camera. We use it all the time to dub over to Digital Betacam and even DVCam, purely digitally.
The YA903G is a cool board. It's filled with RAM chips, and lets you continuously record without moving tape, storing up to fifteen seconds of frames. We call this the "never-miss-a-shot" feature. Let's say you're set up to record a tree falling in the woods, but you don't know when it's going to fall. With an ordinary camera you have two choices: 1) record on tape every second, minute, hour, day, until it does, or 2) be prepared to start the recording the instant the tree begins to topple. Both methods have drawbacks. 1) You may have to go through hours of tape and then, inevitably, the moment you change tape the tree goes down. 2) You may be late hitting Start and miss the first half of the action.
With the "pre-recording" board you'll always get the last 15 seconds. So, when the tree starts to go over, you casually start the tape rolling. Even if it hits the ground before you started rolling, you'll still have the action. The tape then records the delayed output from the RAM, so you capture the whole sequence intact. Not only does the board record video, it also gets the audio, so if a tree falls in the woods you'll know whether or not it made a sound.
You can also use the Y903G to record stop-motion, in increments as short as 1 frame, at whatever interval you would like. This is a neat feature for capturing clouds moving, flowers opening, or city lights coming on.
Finally, Panasonic offers the GPS-900G, that lets you record ground positioning satellite data (latitude, longitude and altitude)." I guess we could call this the "never-get-lost" board?
There are so many other features in this camera I don't have the time or space to mention them. Suffice it to say, the 900 is amazingly-equipped.
Ever since the introduction of the SDX900's little brother, the DVX100, there have been many questions about, and confusion over, the nature of the various shooting modes: 60i, 30p, 24p and 24pa. I'm not the right guy to explain this, so if you go to this link ftp://ftp.panasonic.com/pub/Panasonic/Drivers/PBTS/papers/Progressive-WP.pdf, Video Systems' Steve Mullen will fill you in (though perhaps in more detail than you need). How is the SDX900 to use? In many respects, it's no different than any other big camera. What sets it apart are the user-settable features. It's a well-engineered and well-made tool. The Videosmith SDX900 has been in service since the summer and has proved to be robust and reliable. The image quality is very good. Customers have been lining up to rent it (so much so, we just added a second to our inventory).
My favorite feature beside the sometimes labyrinthian menu system, is the ability to record a full 4:2:2 digital signal in either 4:3 or 16:9 at various frame modes. That is unique, and very useful in today's ever-changing video market.
If I was going to buy a big camera for myself today and did not need High Definition, I would definitely get a Panasonic SDX900. I know my Sony rep wouldn't be happy. I've bought nothing but Sony since 1988. But they don't currently have a camera that will match the flexibility and capability of the SDX900. You go, Panasonic!
© Steven Trent Smith
|
|
 Those features alone make the Panasonic the most versatile camcorder on the market. But wait . . . there's more! Analog to digital conversion is 12-bit, rather than the more usual 10-bit, resulting in better image quality. There are four channels of full 48kHz digital audio (accessible through a pair of XLR's on the back). It has gain settings up to +48dB (a bit noisy, but a recognizable image nonetheless). Then it has Digital Super Gain that gives a maximum gain of +68dB (more later). And most impressive of all, the camera has an amazing range of user settings that let you diddle with all sorts of parameters, like chroma, hue, skin detail, and for you film buffs, gamma curve.
|
Write a Letter to the Editor
Join our Mailing List
© The Digital Journalist
|