 |
→ April 2005 Contents → Camera Corner
|
Camera Corner:
Sony HVR-Z1U |
 |
||||||||
|
Here we have the cats meow. In three decades of shooting video I have never come across a camera I like as much as Sonys new DV format, high-definition HVR-Z1U.
Okay, I waxed eloquently about Panasonics SDX-900 and DVX-100, and I still believe they are impressive camcorders. The SDX-900 remains my first choice of Big cameras. But for a variety of reasons, the Z1 takes things to a whole new level.
This machine records in three formats: standard definition miniDV, DVCam, and high-def HDV 1080i. There has already been grousing about Sonys decision to use interlace instead of progressive scan. But the company has long been an advocate of the former. The Z1 employs the basic HDV format, agreed upon by many manufacturers in Japan. The only other entry in the HDV race, thus far, is JVCs 720p camcorder. But Panasonic is not far behind. Word is that theyll be introducing the AG-HVX200 at NAB in Las Vegas later this month, which will record on a P2 card in either 720p or 1080i.
While the DVCam format records at 28.218mm a second, both the DV and HDV record at 18.812mm. So, a 60 minute tape really is 60 minutes. I almost forgot to mention that the Z1 records either NTSC or PAL.
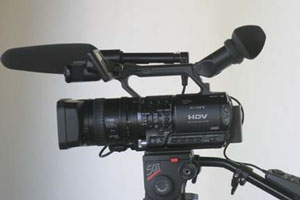
The HVR-Z1U uses newly developed 1/3-inch CCDs that have a pixel count of an astonishing one million, three times the resolution of the chips in the PD-170. And for the first time in DV (and this is the really cool thing), the CCDs are true 16:9 widescreen.
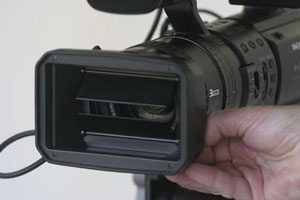
Speaking of the lens, Sony worked a deal with Carl Zeiss to design a Vario-Sonnar T* 12x zoom. This is equivalent to 32.5 390mm on a 35mm camera. The front diameter of the lens has been increased to 72mm. More about its performance later in the review.
Now lets take a closer look at the HVR-Z1U.
The left side of the camcorder has a lot more buttons than weve seen on earlier Sony offerings. Along the base is an array that includes Iris, Gain, White Balance and Shutter buttons, letting you switch between On/Off or Auto/Manual. An adjacent Auto Lock switch can hold the settings for you.
Taking a cue from Big cameras, Sony has added a three-position White Balance switch that lets you store two settings (A and B) or use the Z1s indoor or outdoor Preset. The outdoor mode defaults to 5800K, but you can adjust it up or down in seven steps of 500K. To take a manual white balance, you need to press either A or B and hit the one-push switch just above.
There is also a three-position switch for Gain control: Low (0dB), Medium (+9dB) and High (+18dB). Using the menus you can change these default settings to suit your needs.
At the front of the base, just below the lens, is the Iris dial. When set to manual, you turn this to set your F-stop (1.6 to 11), which youll see in the viewfinder. The annoying stepping-effect so common in the earlier Sony DVs appears to be gone.
The neutral density control is just above, and works like that on the VX and PD cameras. There are two filters (1/6 and 1/32) and Off. The camera will tell you when it thinks it needs ND by flashing a message on the screen.
The Zoom control switch lets you go from motorized zoom to manual zoom. Sony has thoughtfully provided a lever on the zoom ring. The Focus switch has three positions: Auto, Manual and Infinity. The Auto mode is more positive than ever, meaning that the noisome seeking is pretty much gone. Infinity shifts the focus to you guessed it infinity. And just below this switch is Push Auto, which when depressed will focus the lens on whatever youre aiming at. On top of the camera is an Expanded Focus button. This digitally doubles the picture for five seconds to help you focus better. But it didnt help me one bit. There is a primitive focus read-out in the viewfinder. But instead of the double-digits used by Panasonic, you see the distance in meters. This is not at all helpful when you need to do an accurate, repeatable pull focus from one subject to another. At least I think you see distance values. There is nothing in the manual about this, and Im writing without the Z1 in front of me. Cest la vie.
The cassette door is on the left side. And just in back of it are two audio level controls, which well get to further along.
There are six additional buttons on this side three aligned vertically and three horizontally. Called the Assign buttons, they constitute one of the neatest features of the Z1. Using the menus you can choose from between 15 different, valuable functions to assign to these buttons. The most useful of the choices are Color Bars (full SMPTE bars, for a change), Steadyshot (much improved over earlier versions), Viewfinder Marker (to delineate your safe area), and Hyper Gain (+36dB gain with lots of noise, but a still useable picture).
Lets go check out the right side.
The major feature is the handgrip and zoom control. The usual On/Off switch is in its usual place. There are a pair of XLR connectors toward the front, each with a switch for phantom powering microphones. Under a flap live three more connectors: S Video, Analogue Component Output and Audio/Video In/Out. A special cable, included with the camera, plugs into the Component connector to output a Y/PB/PR signal for monitoring high def. On the top back of the grip youll find the Lanc and Headset jacks. There is a connector block toward the rear, which is where you output HDV and DV via Firewire.
The rear of the HVR-Z1U has a bunch of controls, the most familiar of which are the Menu button and Sel/Push Exec (Sony-talk for the dial that lets you scroll down the menus and select items). The most interesting of the buttons are Picture Profile and P-Menu. As youll see, these allow you to set and access recording modes and values. Theres also a Zebra/Peaking switch.
The top of the camcorder is chock-a-block full of stuff. Theres the usual adjustable angle viewfinder. Instead of being just B&W, like on the PD-170, its full-color and very sharp. With the menus you can adjust the color or remove it entirely. The usual handle-mounted Start/Stop and Zoom buttons are there, but with an extra switch to let you set the zoom speed from High to Low to Off.
Then we get to the pièce de resistance the LCD screen.
This 3.5 high-resolution screen sits on the top front of the camera. A nifty swivel lets you pull it out and pivot it to suit your viewing needs. It can store LCD down or LCD up. And when the LCD faces up, both it and the viewfinder are on simultaneously.
The screen hides a whole bunch more buttons, like volume control, time code settings, playback controls, and a master reset switch. There is also a standard microphone clamp on top.
That about covers the physical layout of the Z1U. Lets dig a little deeper, starting with the lens.
As I noted earlier, the Picture Profile feature is pretty cool. You can choose between any of six profile memories. They come from the factory set up thusly:
PP1 Standard HDV mode. PP2 Standard DVCam format. PP3 And I quote, Appropriate setting to record people. Huh? PP4 Film mode. PP5 Appropriate setting to record sunset. PP6 B&W.
Thats how the Z1 arrives. But you have direct control over myriad parameters that you can load into a custom profile. Among these are Color Level, Color Phase (hue), Sharpness, White Balance Shift, and Black Stretch.
Years ago Ikegami, at the urging of ABC, developed a circuit officially known as Skin Tone Detail, but better known on West 66th Street as the Barbara Walters Mode. What this lets you do is suppress facial wrinkles without affecting any other part of the picture, using flesh tones. This is a feature now common on Big cameras, but new to the little guys.
Your profile can also employ Cinema-Tone, which alters the gamma to produce more film-like images. Cine-Frame lets you choose between 24fps, 25fps and 30fps recording. Or as Sony puts it, Pictures are recorded with a cinema-like atmosphere. To my eye, the 24fps setting looked very jerky when played back on a monitor (in this case, a 42 Sony Professional Plasma display). The 30fps mode, however, looked terrific. If you dont need to transfer to film, by all means shoot at 30fps to get a smooth, good-looking cine effect.
You can, for example, do color correction in the camera. While Id prefer to do that in editing, there may be times when you want to tweak the color in the field. There are two separate modes. Color Revision and Color Extract. You can select a color to fiddle with. For example, you can decide that you want all but a particular range of reds to record in black and white. Or you could change a blue sky to pink or green. Using the phase, range and saturation adjustments you can pick the color you want to isolate, and even change it. What will they think of next?
Through the menus you can access all sorts of things. Steadyshot isnt just on or off. You can also increase the effect by clicking on Hard, decrease it with Soft, or, when youre using a wide-angle converter, select a Steadyshot specifically for that purpose.
The Marker lets you choose between 16:9 and 4:3 frame lines, as well as TV safe. You can choose to set the Zebra anywhere from 70 to 100 IRE, in five-unit increments. You can even decide whether you want your Setup level (i.e., Black) at 0% or 7.5%. Yoicks.
It appears that Sony has done away with the Time-Lapse feature on the Z1, instead adding Frame Record, which can do stop-motion recording (animation).
The audio setup menu will be familiar to anyone used to working with a PD-150/170 or even the DVX-100. There are mainly just a bunch more choices than before. You can set monitoring to be both channels 1 and 2, or listen to just one in your headsets. You have access to the audio limiter, which I tend to leave on. One nice feature is that you can separate the AGC, so that its only on one channel. You can select your microphones, noise reduction, wind noise reduction and sensitivity.
In the XLR section of the audio menu youre able to trim the input levels of either channel, and even add wind reduction for external mics. When this mode is selected a little wind sock appears in the viewfinder. Cute.
The next menu is for the LCD screen and viewfinder. There are controls to adjust the color levels of both viewing devices. Plus you can set the backlight level on the screen and brightness of the finder.
The In/Out menu is new and its important, for here you select your recording format between the three options: HDV1080i, DV or DVCam. If you record in 4:3 you can set the way the picture will be displayed both in the finders and on a monitor.
The HVR-Z1U has a sophisticated downconverter built into it. Using this set of menus you can choose to output in HDV or DV. And you can also select whether the converted signal goes out as 16:9, squeezed, letterboxed or edge cropped.
The time code functions, as well as user bit settings, are all fully accessible in the menu, as are various items like setting the clock, turning on or off the red recording lights, and even the rotation direction of the Iris knob. One handy feature here lets you set the zoom display in numbers (0-99), like on the Panasonic DVX-100. Alas, there is no such choice for focus.
So, in a nutshell, thats all the stuff in the Z1. But how does it all work? Pretty niftily, I would say.
The camera handles like most other DV types, though its a bit heavier. I did find the handgrip on the Z1 to be less comfortable than on my PD-150. I tend to shoot using the viewfinder rather than the LCD. Normally both are not on simultaneously, but if you fold the LCD back into its storage position, with the screen facing outward, it displays a picture at the same time the finder is on. That was a useful feature for me. The 16:9 finder is sharp. Theres lots of room for icons, which can clutter the image if youre not careful.
With practice you can learn to feel out the array of buttons down the left side of the camera, so that flipping on Gain or flipping in ND becomes second nature. The same goes for accessing the menu button and dial at the back of the camera. Switching the Picture Profile is quite easy, though in practice youll probably only do it once, at the beginning of a project. For my tests I shot at a variety of frame rates in both 1080 high def and 480 standard def, which I set up in the PPs beforehand. I like Sonys placement of the VTR controls under the LCD. Theyre a lot handier now than when they were hidden by the handle.
Shooting with the Z1 is a pleasure. It seems to handle more like a big camera, in the sense that you can respond more quickly to fast-moving situations than with other DVs. This may sound strange, but I felt that using this camera was more intuitive.
Minimum illumination for the Z1 is 3 lux, whereas on the PD-170 its 1 lux (the PD-150 was 2 lux). Given all the other great features, this didnt strike me as a serious shortcoming. You can always go to +36 Hyper Gain if you have to get a picture under horrible conditions, but its awfully noisy.
Unless you want to edit machine-to-machine (who does that anymore?), youll need to upload your images to a computer. I have a Sony Vaio RA910G Digital Studio model, which interfaces beautifully with Firewire. With normal DV you can digitize with Sonys DV Gate Plus program, which gives you full control over in and out points and will do batch processing.
Sony now offers an update for DV Gate Plus update which lets you import HDV directly into the Vaio, and even create a low-resolution proxy clip to enable me to edit more quickly with smaller scene files. Alas, I did not get the upgrade in time to try it out.
The next best thing I could do was to use the Z1s built-in downconverter to change the 1080 to 480. I compared the down converted material with some shots Id uploaded off my PD-150. The difference was immediately apparent the images coming from the Z1 were noticeably sharper than from the 150. If there was any signal loss (other than halving the resolution) I was unable to see it. By the way, I was viewing this video on a high-resolution 18 Sony LCD computer monitor.
There are already a great many HDV editing solutions available. While Apples full-blown Final Cut Pro is not yet HDV compatible, their iMovie HD and Final Cut Express HD are. Adobes Premiere 1.5 offers a free HDV patch.
Sonys own Vegas software can work with the new format. And many other suppliers are jumping onto the bandwagon.
Next, I plugged the Z1 directly into my 42 plasma monitor using the component cable that comes with the camera. Now I could view the HDV images as they were meant to be seen.
Wow.
The high-definition pictures just popped out of the screen. They were super sharp; the amount of detail was amazing. What appeared fuzzy in 480 was crisp in high def. Perhaps they werent as good as those shot on a $90,000 HDCam, but they were sufficiently impressive to blow my socks off.
Heres something for you to consider. Lets say your next project is going to be standard def 4:3 DV. Why not shoot it at 1080i? It doesnt cost a penny more to do it this way. Indeed, youve nothing to lose and everything to gain. Just downconvert the video, edit it normally and deliver to specifications. But in your tape library you have a high-def, wide-screen original that essentially future-proofs your project. That, to me, is one of the most exciting things about this new HDV format.
The way that miniDV democratized filmmaking, by putting high-quality capabilities into an inexpensive platform, and therefore, within reach of just about anyone, is about to happen again with HDV. And I believe that Sonys HVR-Z1U will lead the way.
© Steven Trent Smith
|
|||||||||

Back to April 2005 Contents
|
|