 |
→ April 2007 Contents → Column
|
Compression Session:
How to Achieve Movement on Still Photographs in FCP April 2007
|
 |
|
Frequently I'm asked a lot about how to do those "Ken Burns" moves on still photographs in Final Cut Pro, so I thought it was time to finally put it all down on paper.
These photos here are from Dirck Halstead's "Moments in TIME" presentation that I cut for him a few years back. The examples are shown in an HDV timeline.
For movement on stills using hard cuts (no dissolves):
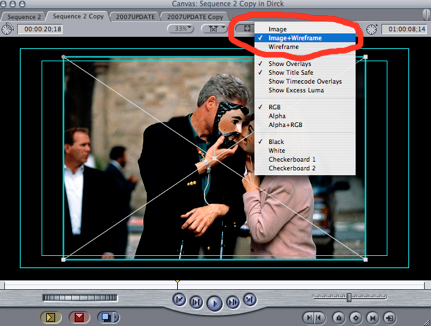
Set Canvas to Image and Wireframe using the small icon on top right. See screenshot below.
Double Click on the still clip in the timeline
Put playhead to the beginning of clip or where you would like movement to start
Reduce/Enlarge the still frame in Canvas to your liking and hit the keyframe button on the lower right corner of the Canvas window. (It's the third button from the right.)
See screenshot below.
Put playhead at end or where you would like movement to stop
Keyframe should automatically be set by FCP and the cross lines turn green indicating that a keyframe has been set, but if not, hit the keyframe button again.
Play timeline to check if it's correctly set.
Render.
Here's a QuickTime tutorial showing all the steps using one 5-second photo clip. You can download and save this to your desktop for reference.
http://www.hulaboyproductions.com/hardcutsdemo.mov
For movement when using cross dissolves:
This gets a little tricky because if you just do the above steps and then place a cross dissolve in between two clips there will be a slight pause of movement in between photographs, which is not preferable. (Okay, that was a nice way of saying it's total amateur hour editing!) You want the movement on both the outgoing photo and incoming photo to be smooth and moving without pause.
Note: At the end of this perilous journey, I have a QuickTime movie that has all the steps below.
We're going to use the Motion Tab on the upper right side of the Viewer for this technique. The Motion dialog box is just a diagram of your clip in the timeline. Do not be afraid; it's there to help you.
What you must understand is that the actual movement has to start at the beginning of the dissolve within the clip before the one you're working on, as FCP makes a 1-second dissolve from five frames on either side of the edit point between clips. Conversely, the movement must stop or finish at the end of the dissolve five frames into the next still image. The overlapping of movement is what makes the transition smooth without pause.
To complicate matters more you can't see where the beginning or end of the movement should be because – it's hidden by the preceding and proceeding frames!
Are ya still with me on this?
Here's a screenshot of an example of what must happen with three frames using this technique:
http://www.hulaboyproductions.com/crossdissolve.mov
Okay – fasten your seatbelts, we're going in.
Put Cross Dissolves in between all still photographs first BEFORE doing any of the steps below. You must do this before any movement is applied or it will not work and you'll get that pause in between the photographs.
Set Canvas to Image and Wireframe by the small icon on top right as we did earlier.
Double Click on the still clip
Open the Motion tab. The lighter portion of the area is your clip in the timeline. It will correspond with the playhead in your timeline. Watch this QuickTime. As I move the playhead back and forth on the timeline, so does the playhead in the Motion box move. Same thing, just two ways of seeing it. The playhead in either the Motion box or Timeline will move the other playhead.
http://www.hulaboyproductions.com/motionbox.mov
To begin, set the photograph where you would like it and move the playhead to the first frame of the clip, which is located at the beginning of the cross dissolve. You can tell it's the first frame because an X will show up on the Canvas, even though you're seeing the still photograph that's before the one your making movement on. Use the home & end arrow keys to move the playhead frame by frame in the Timeline to get to the exact spot you want.
Make a keyframe or keyframes in the Motion box. The keyframe buttons in the Motion box are shown below:
Now, go to the other end of the clip and place your playhead just before where the cross dissolve starts and reduce or enlarge or move the clip to where you would like it to end.
If FCP didn't make a keyframe automatically, make a keyframe or keyframes in the Motion box.
This keyframe is just here as a "place-setter" because the actual end of the clip is hidden by the next photograph or video.
Move the playhead to the actual end of the clip which is at the end of the cross dissolve into the next clip. You can tell it's the first frame because an X will show up on the Canvas, even though you're seeing the still photograph that's after the one your making movement on.
Make a keyframe here. Now your Motion box will have three keyframe points on it.
Hit the P key twice and you'll see that your cursor has turned into a Pen Tool with a minus sign. Go to the "Place-setter" keyframes and delete them.
Now you should have two keyframes set correctly. Play the clip to check it and move on to the next photograph in the timeline. Repeat steps on subsequent photographs.
Render and enjoy.
Here's a large QuickTime tutorial file showing all the steps including the action-packed render. I would download it and save this to your desktop for reference. (The motion in the photographs is a bit jerky due to the low frame rate used in the QuickTime.)
http://www.hulaboyproductions.com/finalpanscanoutput.mov
Good Luck and Godspeed!
Final note: My colleague Roger Richards swears by a program called MovingPicture by StageTools http://www.stagetools.com that sort of does all this for you. I tried it out and I find my way quicker and easier – but that may be because I've been doing this for years and it's routine by now. By all means check out MovingPicture; it could be better for you – all that matters in the end is that the final product looks professional.
[Next month: Thoughts and observations from the gigantic National Association of Broadcasters show in Las Vegas.]
(And, of course, any question or comments from the e-mailbag.)
© PF Bentley
|
|


Back to April 2007 Contents
|
|